Getting Started with Watermelon Farming
Want to jump into Kenya’s agricultural scene with something that actually pays off? Watermelon farming might be your perfect match. These juicy fruits aren’t just refreshing in Kenya’s heat—they’re cash cows for smart farmers who know what they’re doing.
Watermelon farming has taken off as one of the most rewarding agricultural ventures across Kenya, especially in those hot, dry regions where other crops might struggle. The beauty of this fruit? It loves the sunshine that Kenya has in abundance, and urban markets can’t seem to get enough of it.
If you’re new to farming or looking to diversify, here’s why watermelon deserves your attention: minimal startup costs, relatively quick returns, and strong market demand. You don’t need massive land either—even small-scale operations can turn serious profit when done right.
Where Watermelons Thrive in Kenya
Not all Kenyan soil will give you those picture-perfect watermelons. These fruits have their preferences, and knowing where they’ll flourish saves you headaches down the road.
The stars of the watermelon show in Kenya include counties like Baringo, Narok, Kajiado, Machakos, and Makueni. What makes these spots special? They hit the sweet spot of warm temperatures between 21°C and 35°C (70°F to 95°F)—ideal conditions for watermelon development.
Think arid and semi-arid regions across Eastern, Coastal, and Rift Valley provinces. These areas bring the heat and sunshine watermelons crave—at least 8 hours of direct sunlight daily. This isn’t just about growth; it’s what gives watermelons their legendary sweetness and juice factor.
Free PDF DownloadSoil Prep: Setting Your Foundation Right
Before those seeds touch the ground, you’ve got some work to do. Get this wrong, and you’re fighting an uphill battle from day one.
Watermelons aren’t divas, but they do have standards. They prefer well-draining, sandy loam soils with a pH between 6.0 and 7.0. Heavy clay soils? You’ll need to amend them or look for another plot—waterlogged roots lead to disease faster than you can say “crop failure.”
Here’s your pre-planting checklist:

- Clear out all weeds and debris—give your watermelons a clean slate
- Plow deep and harrow to create that fine tilth watermelon roots love to spread through
- Mix in well-rotted manure or compost—around 2-3 wheelbarrows per 10×10 meter plot
- If your area sees heavy rain, raise those beds about 20-30cm to prevent root rot
- Incorporate a balanced, slow-release fertilizer to feed your plants throughout the growing cycle
Don’t rush this prep phase. A day spent getting the soil right saves weeks of fighting problems later.

Choosing Your Watermelon Variety
You’ll find several watermelon varieties perform well in Kenya, but one stands out as the farmer’s favorite: Sukari F1. There’s good reason for its popularity in commercial production.
Sukari F1 brings impressive credentials to your farm:
- Oblong shape with that classic light green rind with dark stripes
- Deep red, crispy flesh that hits the sweet spot with 11-12% sugar content
- Hefty fruits weighing 7-8 kg each—perfect for market standards
- Thick rind that can actually handle transportation without turning to mush
- Resistance to common watermelon diseases, saving you sleepless nights and pesticide costs
Under ideal management, Sukari F1 can yield between 25 to 35 tons per acre. That’s serious production that translates directly to serious cash.
While other varieties might work for your specific situation, Sukari F1 has proven itself across Kenya’s diverse growing regions. For beginners, starting with proven performers reduces your learning curve and risk.
Planting: Doing It Right the First Time
Planting day—this is where your watermelon journey really begins. Get it wrong, and you’ll be fighting problems all season. Get it right, and you’re halfway to profit already.
Spacing That Makes Sense
Watermelons need room to breathe and spread. Their vines can stretch several meters, and crowding leads to disease and smaller fruits.
You’ve got two solid options for layout:
- Single row system: Place rows 2-2.5 meters apart with plants spaced 60 centimeters within rows
- Double row system: Set rows 3.5-4 meters apart with the same 60 centimeters between plants
For beginners, the single row system often proves easier to manage and navigate when it comes to weeding and harvest time.
The Planting Process
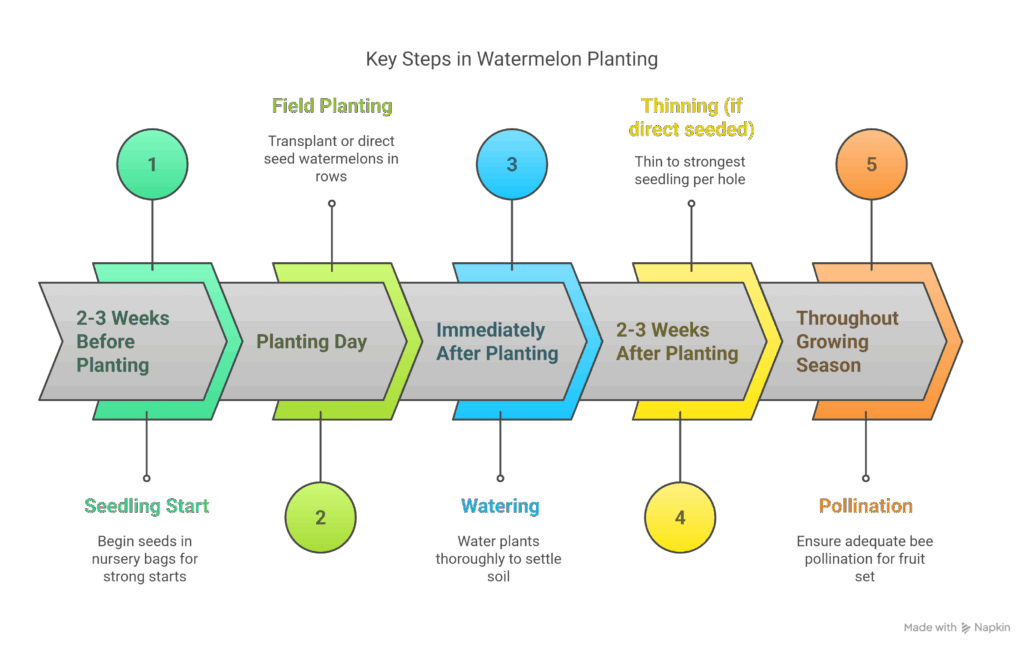
- Dig planting holes about twice as wide and deep as your seedling root balls
- Add several inches of compost or well-rotted manure to each hole’s bottom
- Place one seedling in each hole, carefully spreading the roots
- Backfill with soil, gently firming it around the plant base
- Water thoroughly immediately after planting
- If direct seeding, plant 2-3 seeds per hole at a depth of 2-3 cm, then thin to the strongest seedling
Pro tip: Consider starting seeds in nursery bags for the first 2-3 weeks. This gives them a protected start and lets you select only the strongest seedlings for field planting.
The Pollination Factor
Here’s something many beginners miss: watermelons need bees. These fruits depend on cross-pollination, and insufficient pollination means fewer and smaller fruits.
Commercial farmers place 1-2 beehives per acre to boost pollination rates. As a beginner, consider planting bee-attracting flowers nearby or even partnering with local beekeepers for mutual benefit.
Water Management: The Lifeblood of Your Crop
With watermelons being 92% water, you can guess how important proper irrigation is. Get this right, and you’re looking at sweet, juicy fruits that command top market prices.
How Much and When
Watermelons need approximately 65 liters of water per week from germination until fruiting begins. That sounds specific because it is—underwatering stunts growth while overwatering invites disease.
The crucial periods for water are:
- After planting until seedlings establish
- During vine development
- During flowering
- Early fruit development
Once fruits reach about 70% of their final size, you can actually reduce watering. This concentrates the sugars and improves flavor—a little water stress at this stage is your friend.
Irrigation Methods Worth Your Investment
Drip irrigation stands out as the gold standard. Yes, it costs more upfront, but it:
- Reduces water usage by up to 40% compared to overhead methods
- Keeps foliage dry, dramatically cutting down on fungal diseases
- Delivers water precisely where needed—at the root zone
- Can be combined with fertilizer application (fertigation) for maximum efficiency
If drip isn’t feasible for your budget, consider furrow irrigation as a second choice. Avoid overhead irrigation if possible—it’s wasteful and promotes leaf diseases.
Smart Watering Practices
- Water early in the morning to prevent fungal development
- With drip systems, run for about 30 minutes to reach the 6-inch root depth
- Adjust frequency based on weather—check soil moisture manually by digging down 6 inches
- Use mulch to conserve moisture and suppress weeds
- In extremely hot areas, consider shade nets during the hottest part of the day
Remember: proper watering alone can make or break your watermelon farming venture.
Pest and Disease Management: Protecting Your Investment
Nothing kills profitability faster than pests and diseases. In Kenya, watermelon farmers face several challenges, with the Melon Fly standing out as public enemy number one.
The Melon Fly Menace
The Melon Fly (Bactocera cucurbitae) is the nightmare of watermelon farmers across Kenya. These fruit flies lay eggs under the fruit skin, and the hatching larvae tunnel through the flesh, destroying your harvest from the inside out.
How to spot them:
- Adults look like slightly larger houseflies (6-8mm) with brown patterned wings
- Larvae are cream-white maggots about 10mm long
- Damaged young fruits become distorted and often drop prematurely
- Mature fruits develop water-soaked patches
Taking action against Melon Flies means using multiple strategies:
Chemical Control Options
- OCCASION STAR®200SC (3ml/20L water)
- KINGCODE ELITE (10ml/20L water)
- PRESENTO (5g/20L water)
Always add a sticker/spreader to your spray mix to improve effectiveness and coverage.
Integrated Management Approaches
- Set up baited traps around your farm perimeter to reduce adult fly populations
- Practice strict field sanitation—remove and destroy all infested fruits immediately
- Rotate watermelons with non-host crops like maize or beans
- Wrap developing fruits with protective covers (paper bags work in small operations)
- After harvest, destroy all crop residues promptly
Remember that chemical controls should be your last line of defense, not your first response. Sustainable farming means using cultural and biological methods whenever possible.
Disease Prevention Strategies
Prevention beats cure every time, especially with watermelon diseases. Focus on these preventive measures:
- Choose disease-resistant varieties like Sukari F1
- Practice crop rotation—never plant watermelons in the same plot two seasons in a row
- Use drip irrigation to keep foliage dry
- Maintain proper plant spacing for good air circulation
- Apply copper-based fungicides preventively during humid periods
- Remove and destroy diseased plants immediately

Harvest and Post-Harvest: Turning Fruits into Cash
After 80-100 days of care and nurturing, harvest time arrives. This critical phase determines whether all your hard work translates into profit or disappointment.
Knowing When to Harvest
Watermelons don’t continue ripening after harvest, so timing is everything. Look for these signs:
- The tendril nearest to the fruit stem dries and turns brown
- The bottom spot where the melon rests on the soil changes from white to creamy yellow
- The rind loses its shine and becomes harder to puncture with your thumbnail
- A hollow sound when you tap the fruit (takes practice to recognize)
Early morning harvest is ideal—fruits are cooler and handle transport better.
Handling with Care
Watermelons bruise easily, and damaged fruits quickly lose value. Follow these handling tips:
- Cut stems with sharp shears, leaving 2-3 cm of stem attached to the fruit
- Never pile watermelons more than two layers deep
- Use padding in transport crates to prevent bruising
- Keep harvested fruits in shade while awaiting transport
- Grade your harvest by size and quality—different markets have different requirements
Market Preparation That Makes Money
To maximize returns, take these extra steps:
- Clean fruits gently to remove dirt or debris—buyers eat with their eyes first
- Grade consistently—premium, standard, and processing grades
- Package appropriately for your target market—sturdy crates for distant markets, simpler options for local sales
- Consider branding your premium fruits with small stickers for market recognition
The Bottom Line: Watermelon Farming Economics
Let’s talk money—after all, you’re in this to make a profit. The current average market price for watermelons in Kenya hovers around 30 Kenyan shillings per kilogram, but this varies by season and quality.
Yield Expectations
With proper management, you can reasonably expect:
- 15,000 to 20,000 kg per acre under standard management
- Up to 25,000 kg per acre with optimal conditions
- 25,000 to 35,000 kg per acre potential for Sukari F1 under ideal conditions
Even at the conservative end, that’s potentially 450,000 KSH gross revenue per acre before expenses.
Cost Considerations
Your main expenses will include:
- Land preparation: ~15,000 KSH per acre
- Seeds/seedlings: ~10,000-20,000 KSH depending on variety
- Fertilizers and manure: ~30,000 KSH
- Pesticides and fungicides: ~20,000 KSH
- Labor: ~50,000 KSH over the growing season
- Irrigation: Highly variable based on system choice
- Transport and marketing: ~30,000 KSH
Total costs typically range from 150,000 to 200,000 KSH per acre, leaving substantial potential profit even at moderate yield levels.
Maximizing Your Return on Investment
To squeeze the most profit from your watermelon farm:
- Time your planting to hit market windows when supply is low and prices peak
- Develop direct relationships with hotels, restaurants, and supermarkets to cut out middlemen
- Consider value addition—watermelon juice, dried watermelon, seeds, etc.
- Reduce waste through proper harvest timing and handling
- Integrate with other compatible crops for year-round income
Conclusion: Your Watermelon Farming Journey
Watermelon farming in Kenya offers a genuine opportunity for beginners to enter agriculture with relatively low risk and high potential returns. The keys to success lie in:
- Selecting appropriate growing areas with ideal climate conditions
- Preparing soil properly before planting
- Choosing proven varieties like Sukari F1
- Implementing effective water management systems
- Practicing integrated pest management
- Handling harvest and marketing with care and strategy
Remember that your first season is a learning experience. Keep detailed records of everything—planting dates, inputs, weather events, yields, and prices. This information becomes invaluable for improving future seasons.
Ready to dive into Kenya’s watermelon farming scene? Start small, learn continuously, and scale up as you master the techniques. Your watermelon farming journey could be the beginning of a prosperous agricultural career.
Have questions about starting your watermelon farm? Drop them in the comments below, and let’s grow together!
This blog post has been prepared based on research and insights from experienced watermelon farmers in Kenya. For specific advice tailored to your local conditions, consider consulting with your county agricultural extension officer.